
WordPress 2024: Still My Favorite Static Site Generator
Table of Contents
- WordPress: Make Your Website a Static Website With WordPress In 2024 For Free
- Why Would Anyone Do This?
- What We’ll Do / What You'll Need
- Step 1: Download LocalWP
- Step 2: Set Up LocalWP
- Step 3: Update Permalinks
- Step 4: Install Staatic - Static Site Generator
- Step 5: Staatic Static Site Generator Options
- Step 6: Generate Your Website
WordPress: Make Your Website a Static Website With WordPress In 2024 For Free
Hello, we’re back at it in 2024! The plan here is install WordPress in an offline environment, develop our website, with all the designs, posts, pages and plugins that you like, and then “export it” as a static website using a WordPress plugin. Since my original article in 2016, a lot has changed; WordPress has grown, and there is a new plugin to streamline this process.
This is an update of the process I wrote about waaaaay back in 2016, which apparently got a fair amount of attention. Here’s we’ll look at some updated steps to make the process more modern and streamlined, as well as discover a great place to get some free WordPress themes.
You will want to have the following to complete this process
- A website idea
- Website content (text, images, etc., ready to add into your WordPress website)
- An internet connection
- A computer (Mac, Linux, Windows)
Why Would Anyone Do This?
Each person has their specific way of doing things. A particular process. A unique workflow. There are probably people who would ask me, “Why would you use WordPress to generate static websites? Couldn’t you just use an already existing static site generator?
In fact, in 2024, I would personally recommend using Publii CMS. It is amazing! (they don't pay me to say that. They don't even know).
However, I know many, many, many people use WordPress and have too much time and work invested in that platform. That in itself is a reason to do this. So if you are:
- Really comfortable with WordPress, but don’t have the time to learn another system, just to create a static website.
- You have a client who has a WordPress theme, or insists on using WordPress and simply wants the fastest website possible.
- Just prefer to use WordPress for whatever reason, but are interested in making your website faster and safer...
This may be of interest to you.
There are also some more convincing reasons. Such as this: Security. WordPress, as of May 2024, powers over 43% of all websites in the world. That makes WordPress a huge target for hackers, scammers, and the lot. And even if you keep your WordPress installation up-to-date, a forgotten or deactivated plugin on your website could create an accidental “back door” for hackers to take over and cause havoc.
What if you could create a website using WordPress on your computer, and then publish it as a static website? And by doing so you eliminate many of the security issues inherent in with databases, non-updated themes, software and plugins? And, as a bonus, your site is FAST?
Yes. You can.
If you want to know how, read on.
What We’ll Do / What You'll Need
Here you’ll get a good step-by-step on how to set up a local server and install WordPress (the process is muuuuuch easier today). From there, you will add your content, design, layout, etc. (this is not a design article – that part is all you).
Once you finish setting up your website in WordPress and are at the point where you would “publish” it for the world to see….. that’s where we will change gears. We will upload this static website to the internet (using FTP or whatever you like).
As a bonus, in a follow-up article I will share with you a play-by-play on how to export your website to GitHub. (you can set up a simple website on GitHub for free, provided it isn’t super high traffic or requiring advanced scripting).
Before you invest your valuable time reading, take note of the following:
This article might not be for you if the following is true:
- If you don’t use WordPress…
- If you don’t know how to install WordPress…
- If you desire to have your visitors leave comments (using the WordPress comment feature)…
- If you require real-time, dynamic areas on your website…
- If you aren’t creating a website…
- If you don’t have internet…
- If you are looking for an advanced eCommerce website
If this is the case, I'll understand if you drift off to some other place. (but this article might be of use to someone you know - so please share it).
Ready to begin? Let's go!
Step 1: Download LocalWP
Ok so in order to install WordPress on our computer without moving it to a server, we need to setup a “server” on our computer. Previously we used a program called XAMPP, which is a bit technical and overkill for what we want to do.
For this process, we are going to download LocalWP. There are other options available to set up WordPress offline (such as XAMPP and Studio by WordPress). However, XAMPP is more technical and overkill for what we want to do. And Studio is not currently compatible with the Staatic WP Plugin which we will use to create our static Wordpress site. So head on over to LocalWP and click the download button.
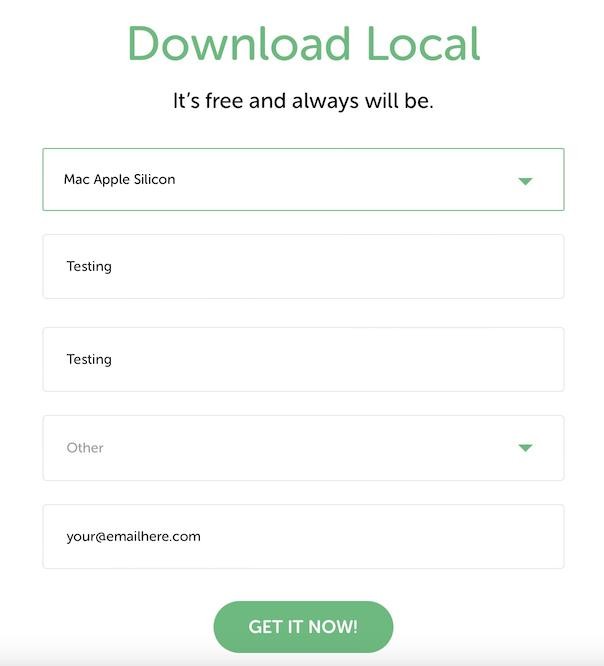
You will need to choose your platform and enter some information. You can enter whatever info you like, including for the email address. Once submitted, you will be able to download the program.
Step 2: Set Up LocalWP
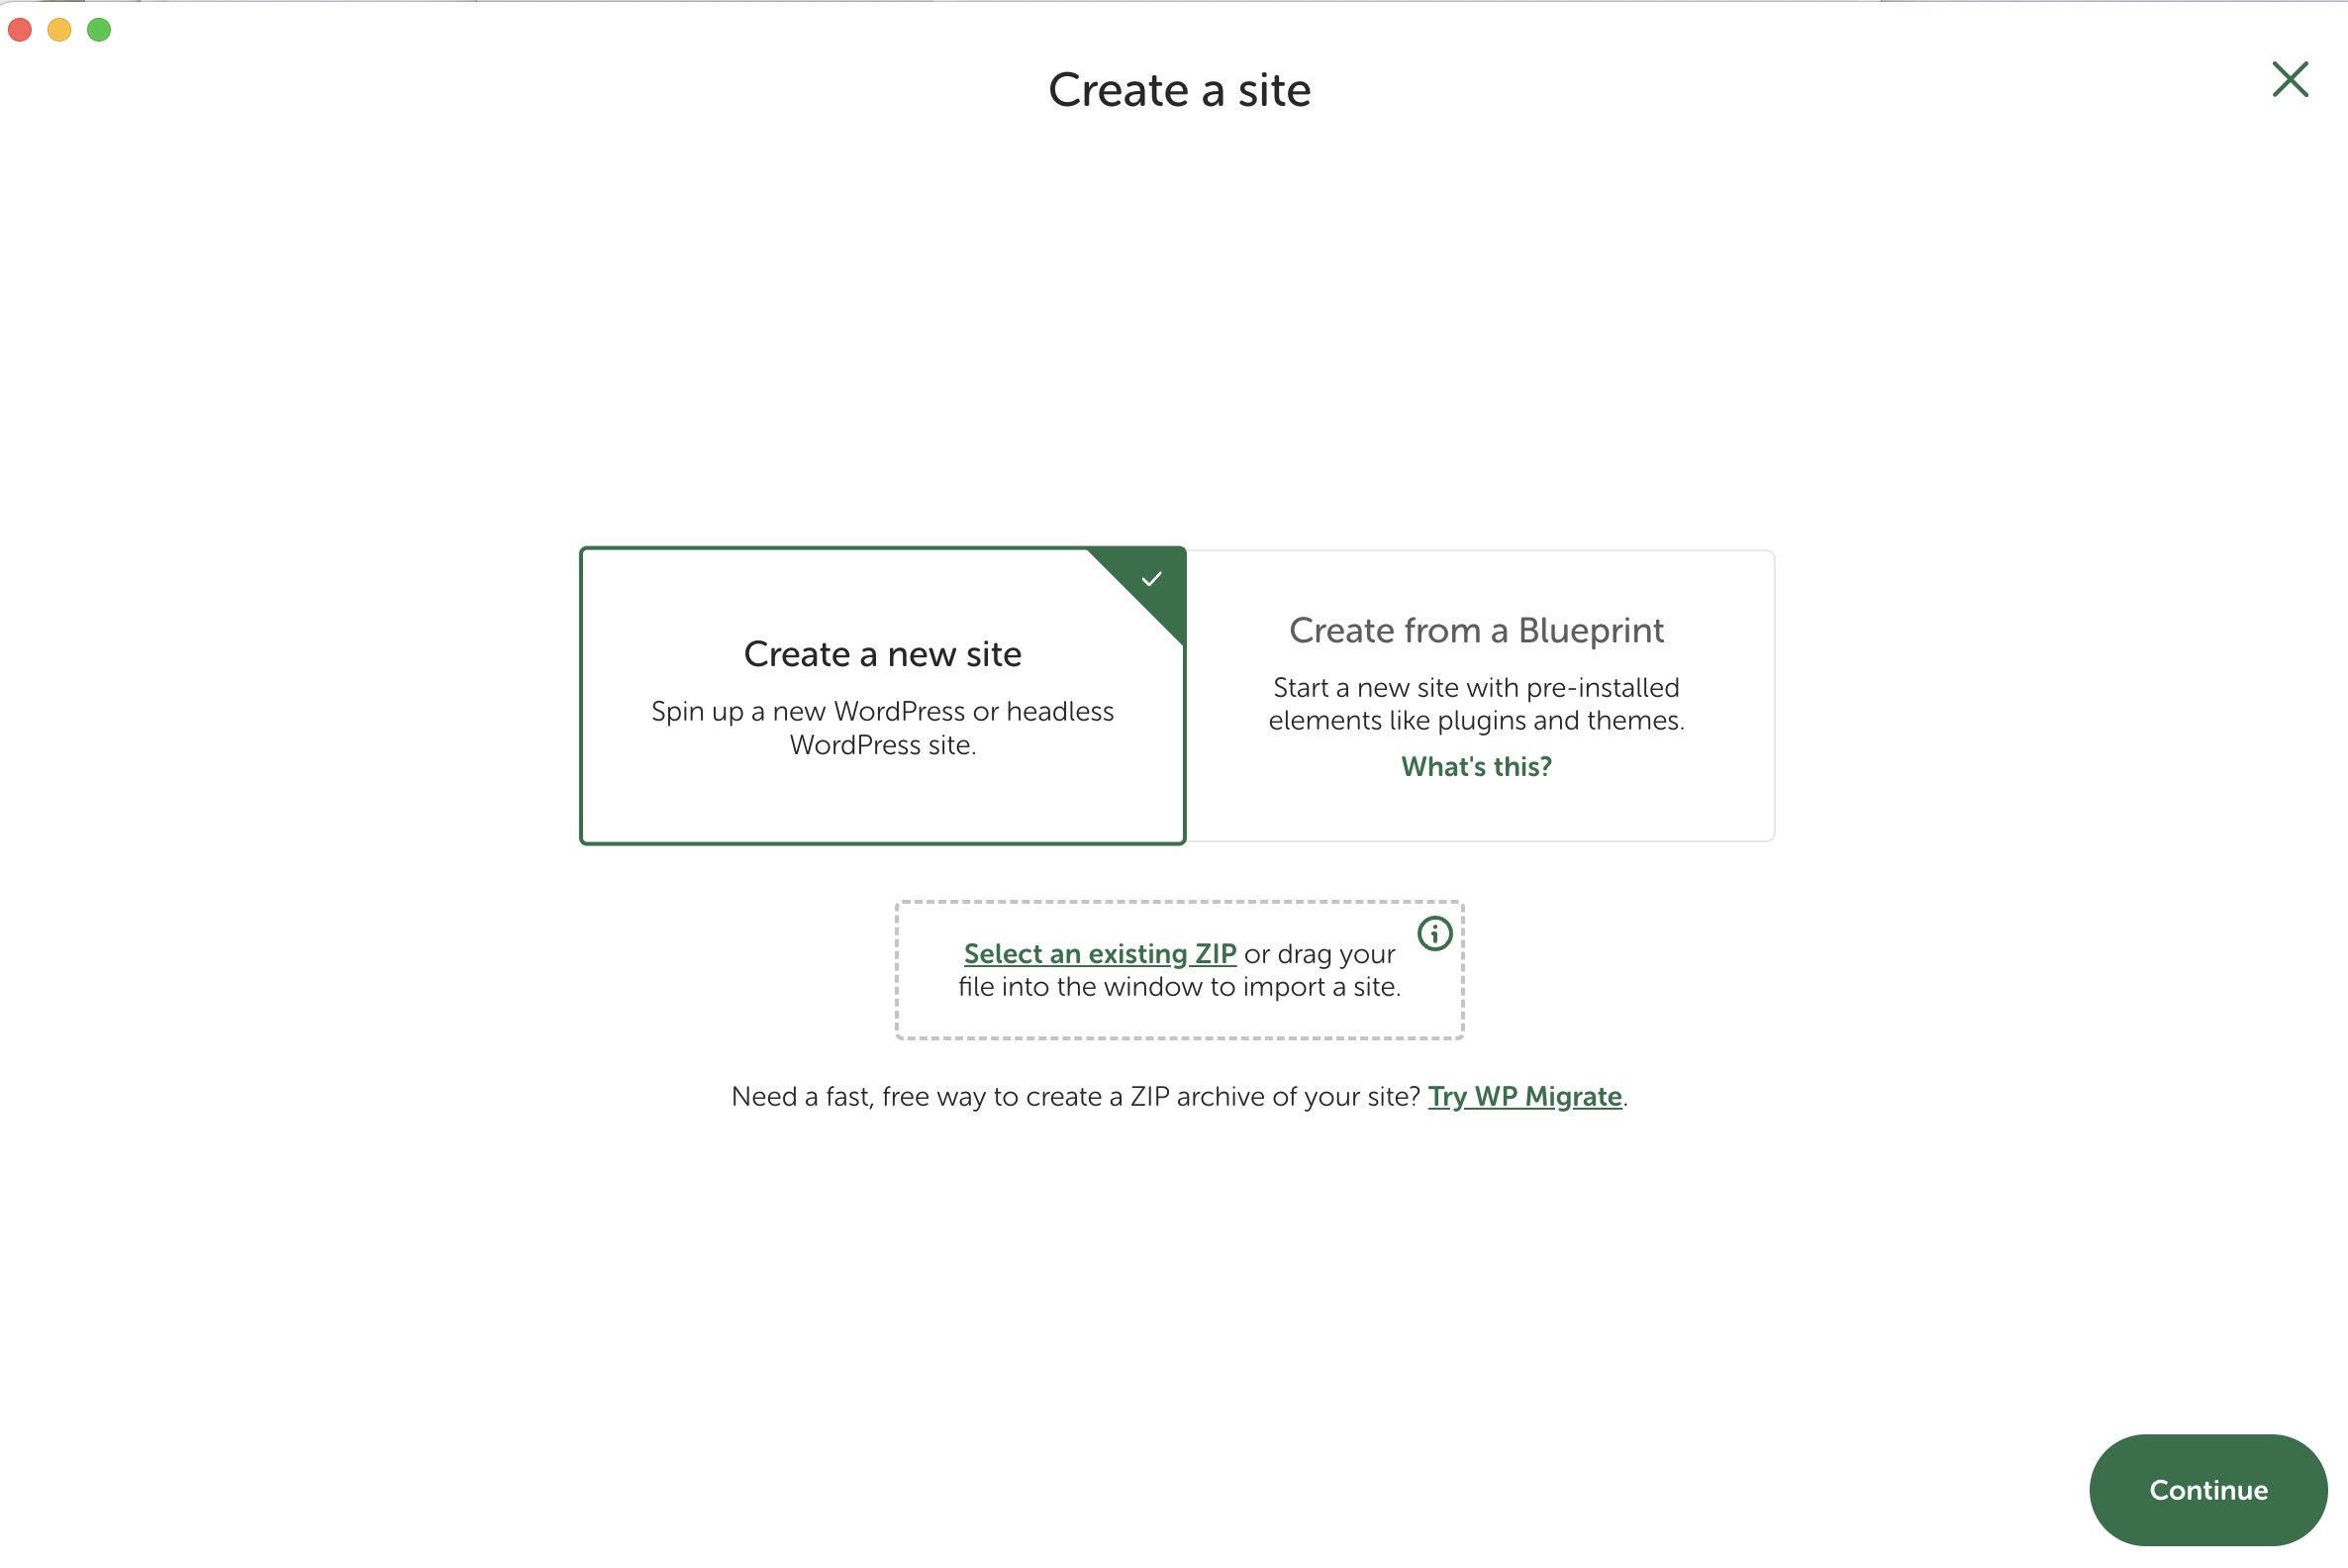
Once you have finished installing the program, you will see options to Create a New Site (default option), Create From a Blueprint or Select an Existing ZIP. Choose the CREATE A NEW SITE option and then CONTINUE.
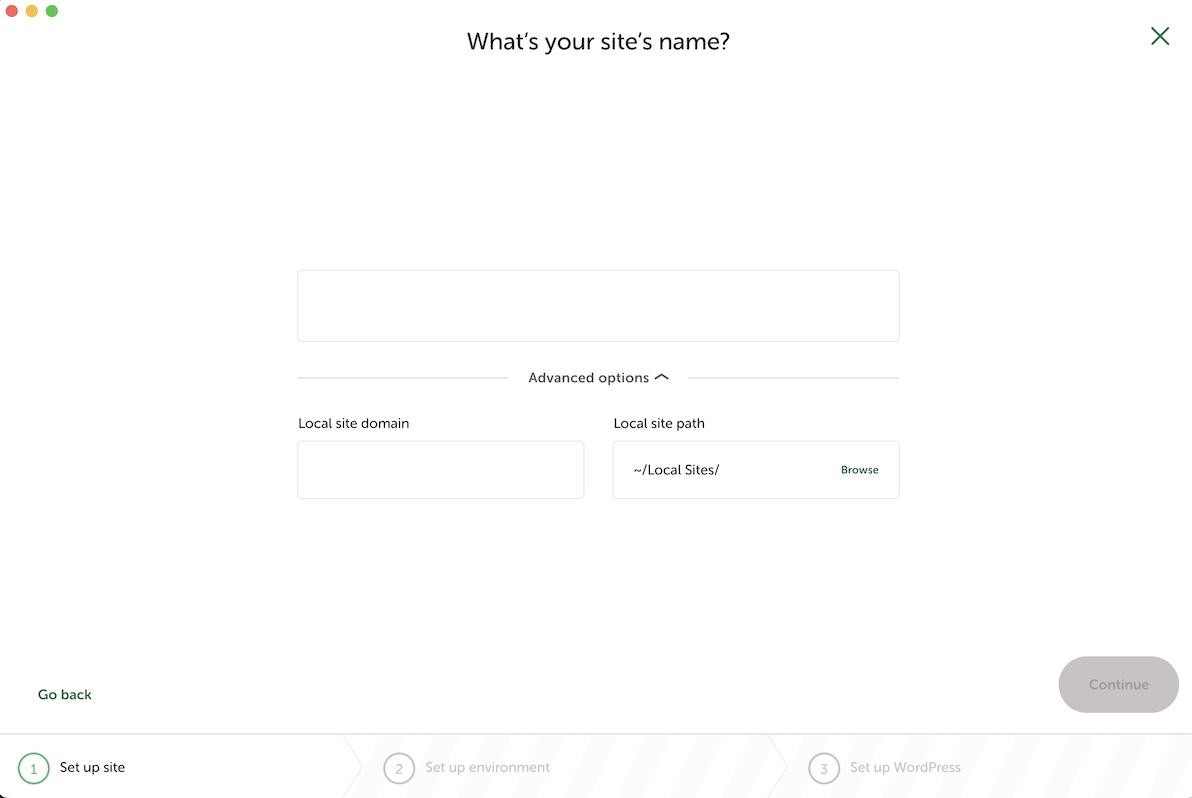
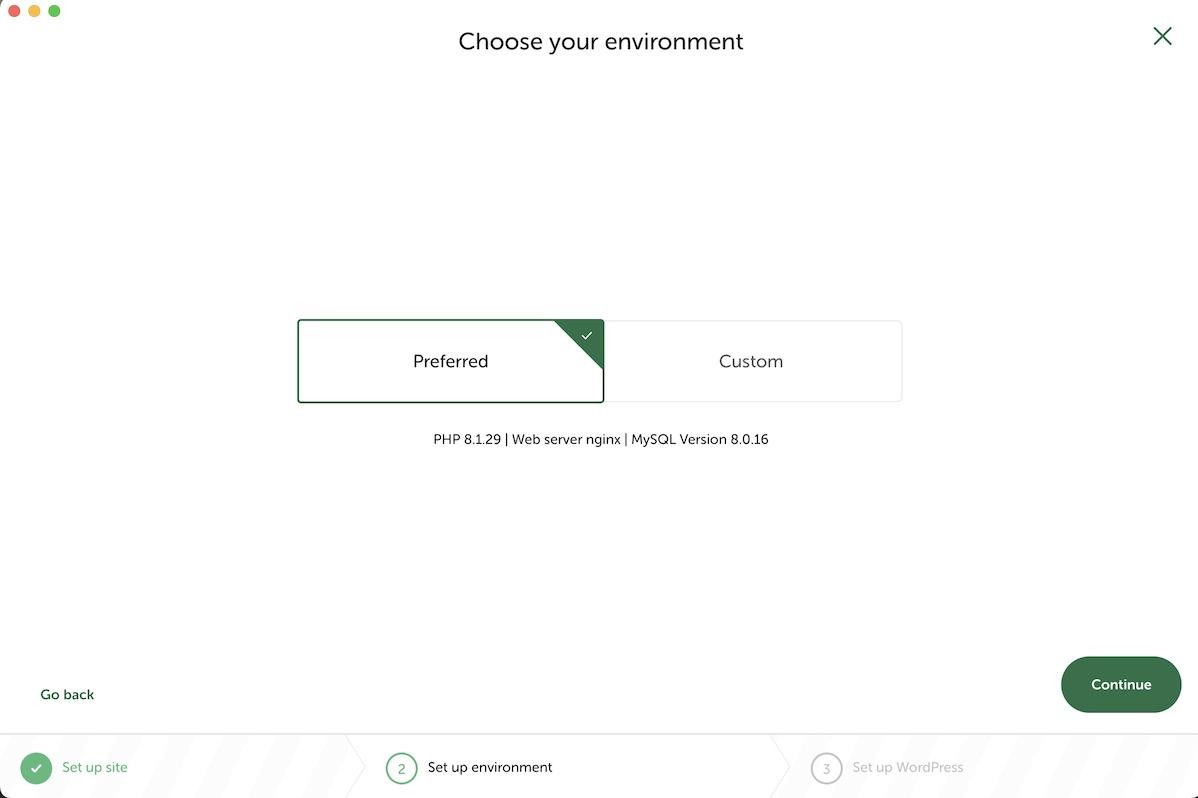
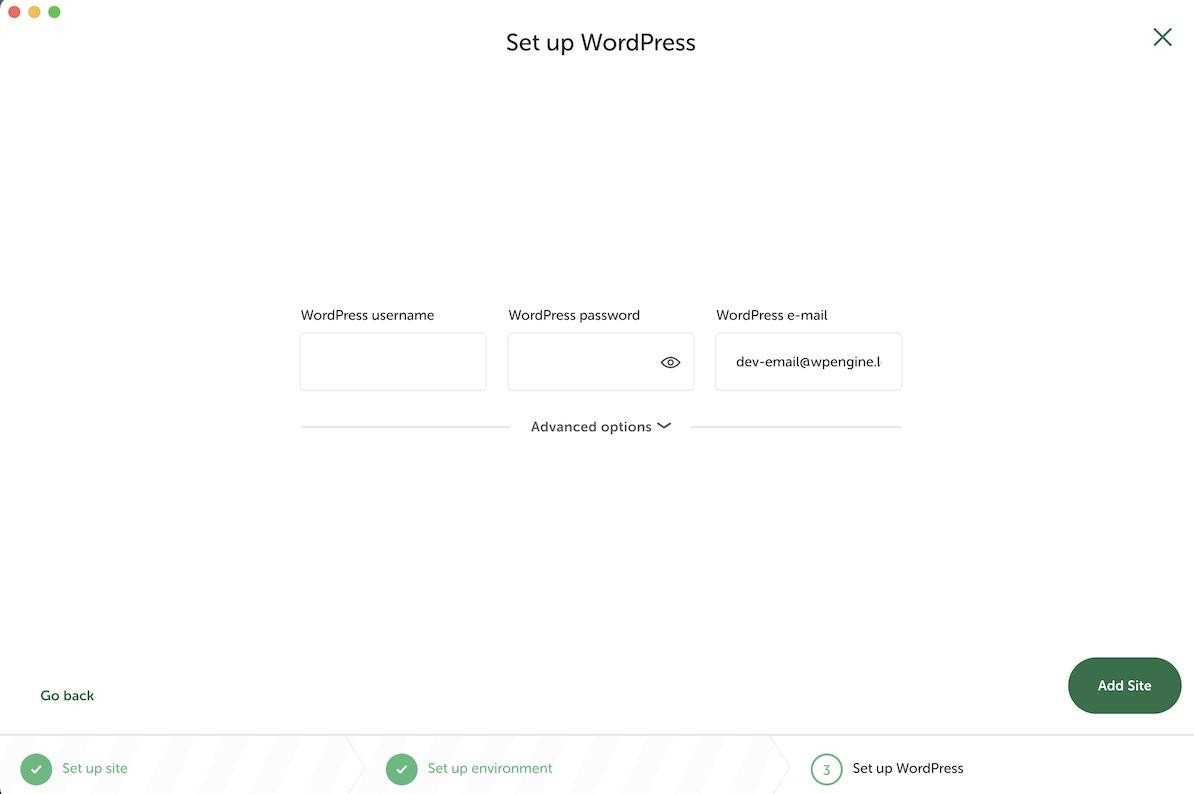
You will then see screens asking you to NAME YOUR WEBSITE, choose your SITE ENVIRONMENT and SET UP WORDPRESS. On the final screen you will set your WordPress username, password and email (if you want). In the ADVANCED OPTIONS below, you can click that and indicate if this is a MultiSite installation. Once you are ready, click the ADD SITE button.
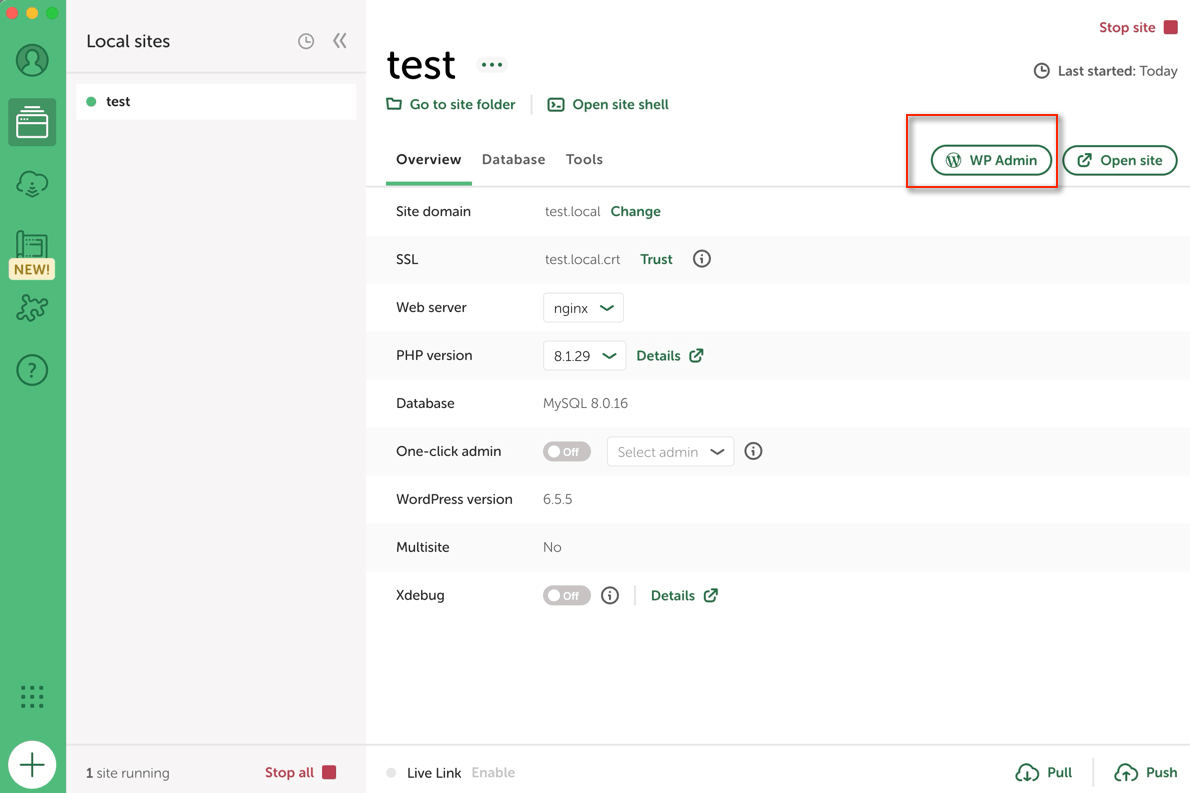
After the setup is complete, you will see the following screen. Note the WP Admin button - you'll next want to click that button to login to your website.
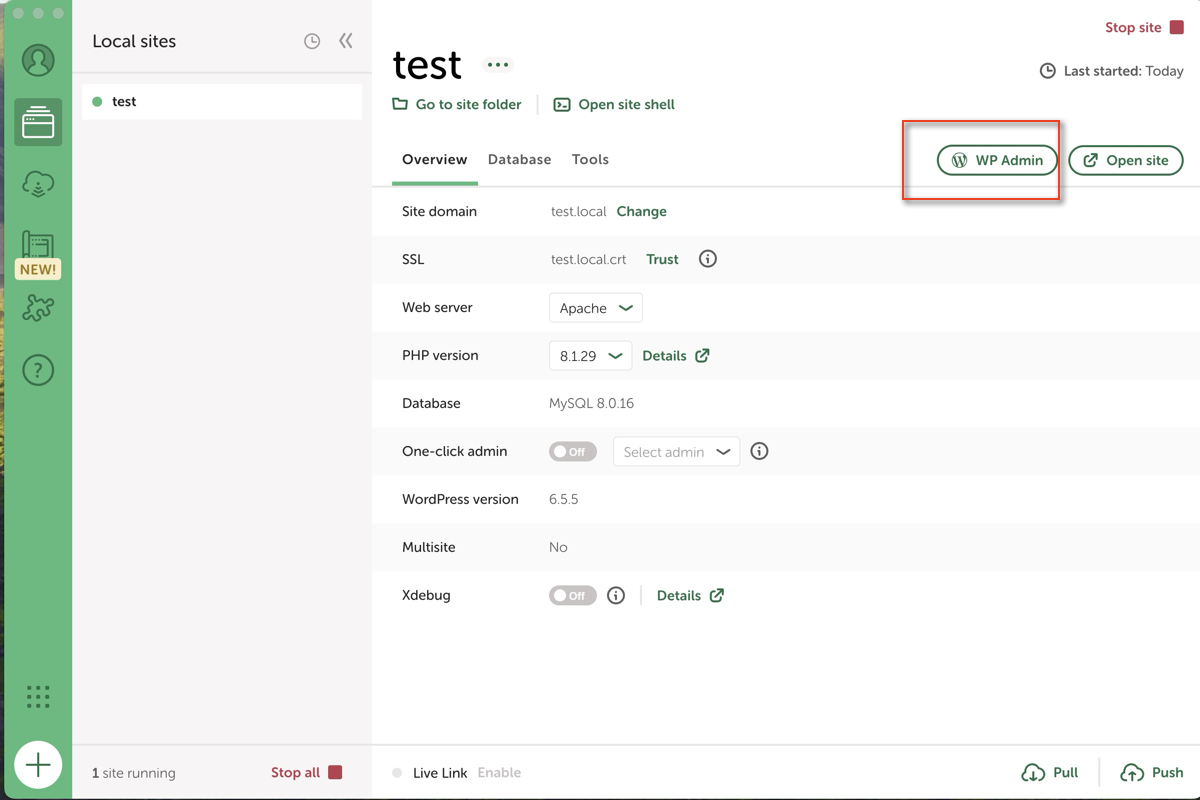
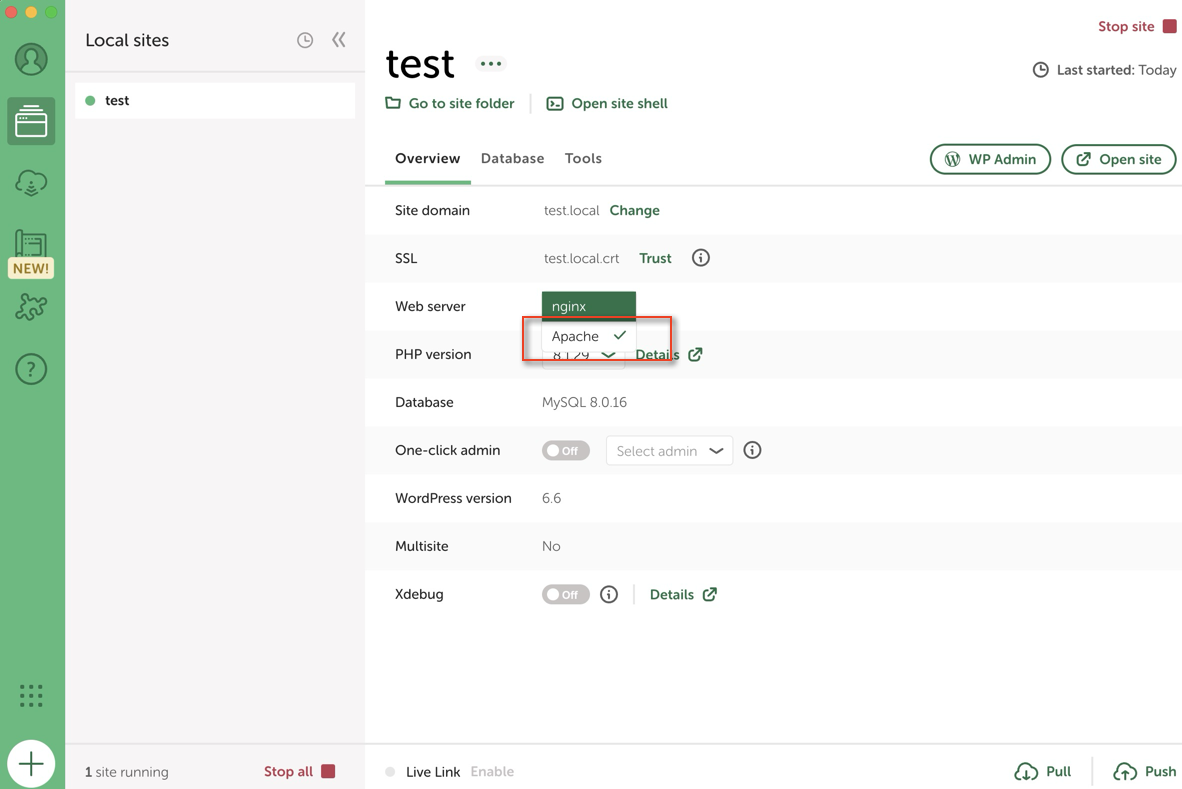
However, first, please make this small but important change. You will want to change your web server to APACHE in the following section, then click the APPLY text that appears:
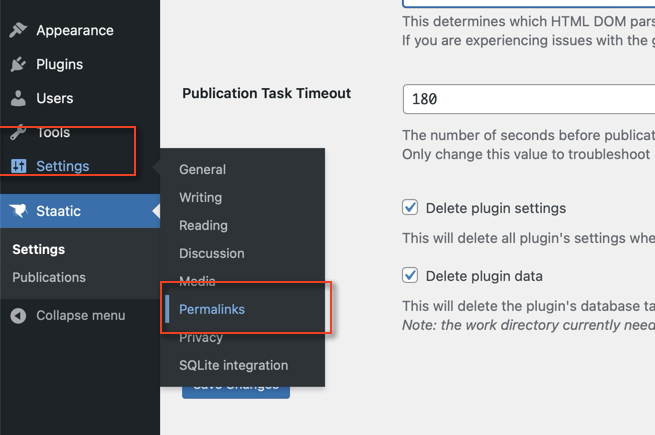
Step 3: Update Permalinks
You will need to go to the permalinks section of your WP admin and choose an option other than the default. The Staatic WP Plugin will not work if you use the default permalinks.
Step 4: Install Staatic - Static Site Generator
We are going to install the Staatic Site Generator WP Plugin here to complete the setup of our process. You could complicate life by doing this manually, but since we just installed WordPress and have an internet connection, just follow the steps below.
First we want to go to the Admin section of our website. So click the WP Admin link, which you should see here:
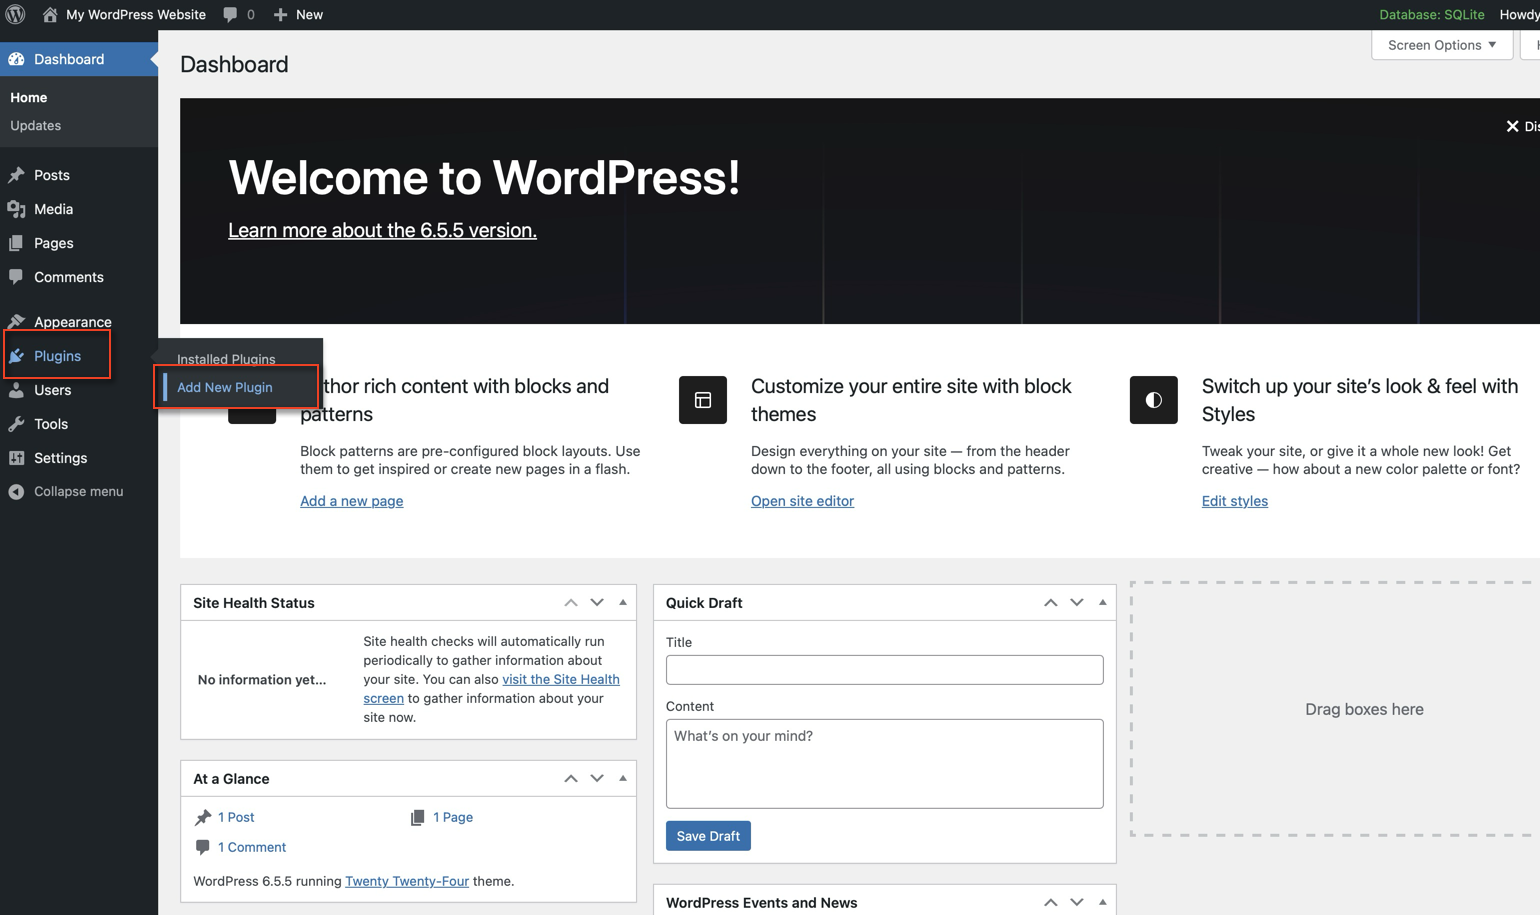
This will open up in a new browser window. From here, go to the PLUGINS sections and select ADD NEW PLUGIN
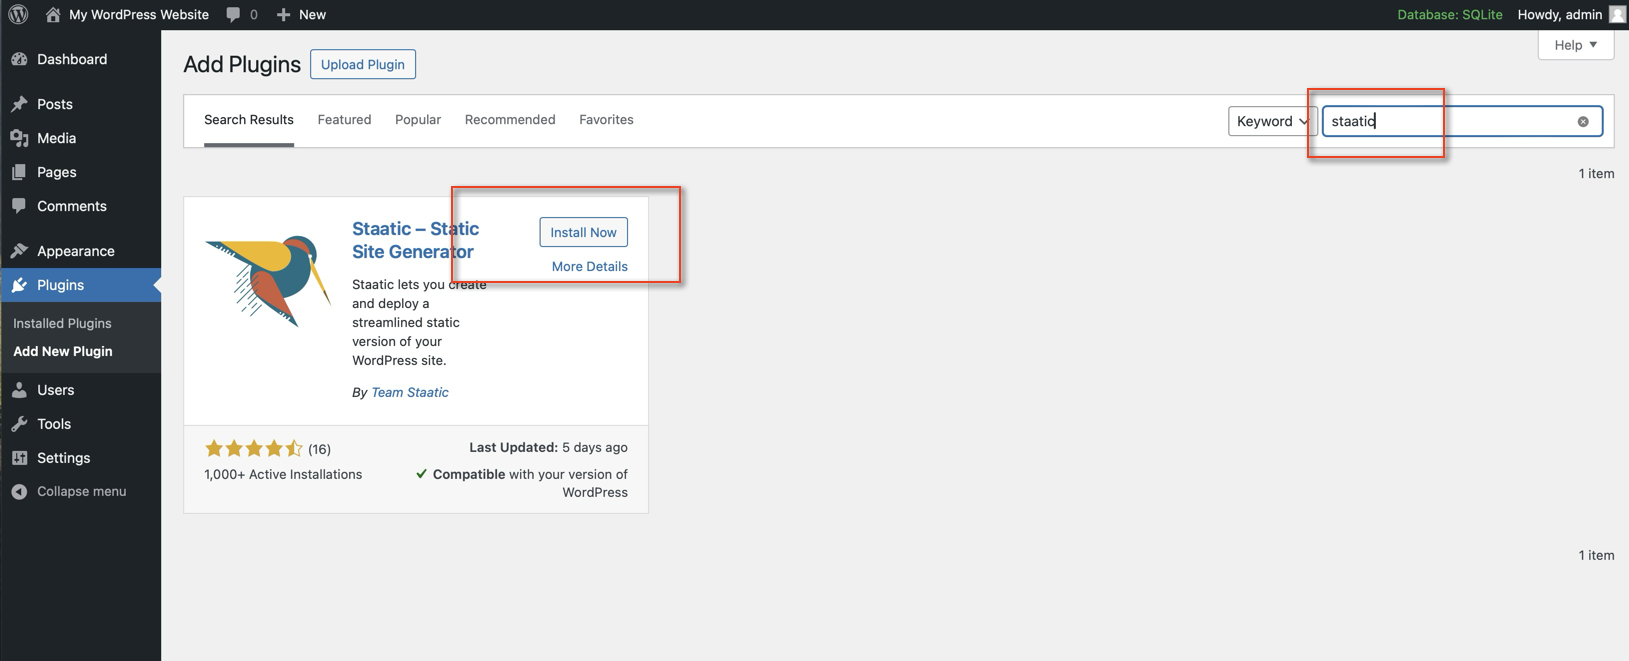
On the new screen type STAATIC (note the spelling) and the following should appear. Click the INSTALL NOW button. Once completed, click the ACTIVATE button that appears.
Step 5: Staatic Static Site Generator Options
From here the plugin is pretty simple, but there are a couple of options that may be important to you:
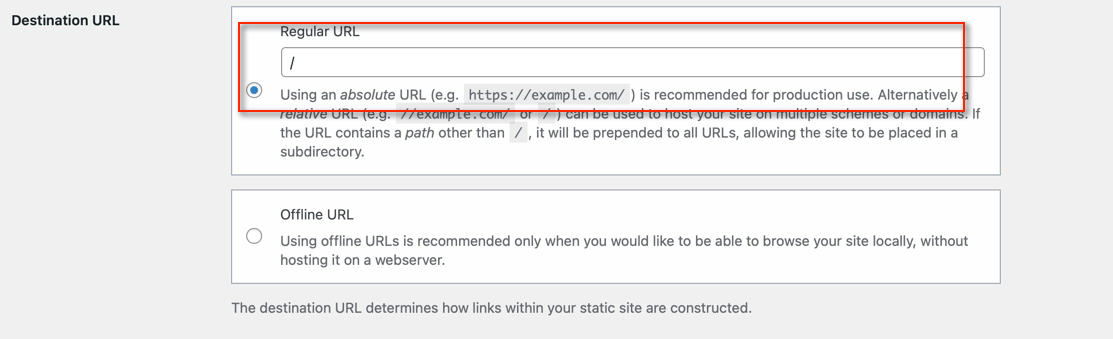
Destination URL: The plugin recommends an absolute URL. This means that, ideally, you know what your full website address will be (for example: www.example.com). In that case, you enter that here and save. If not, or if you plan on using this on different websites, leave the default option as-is.
For now, set it to OFFLINE URL, so once we Publish this site we can actually open it offline and view it.
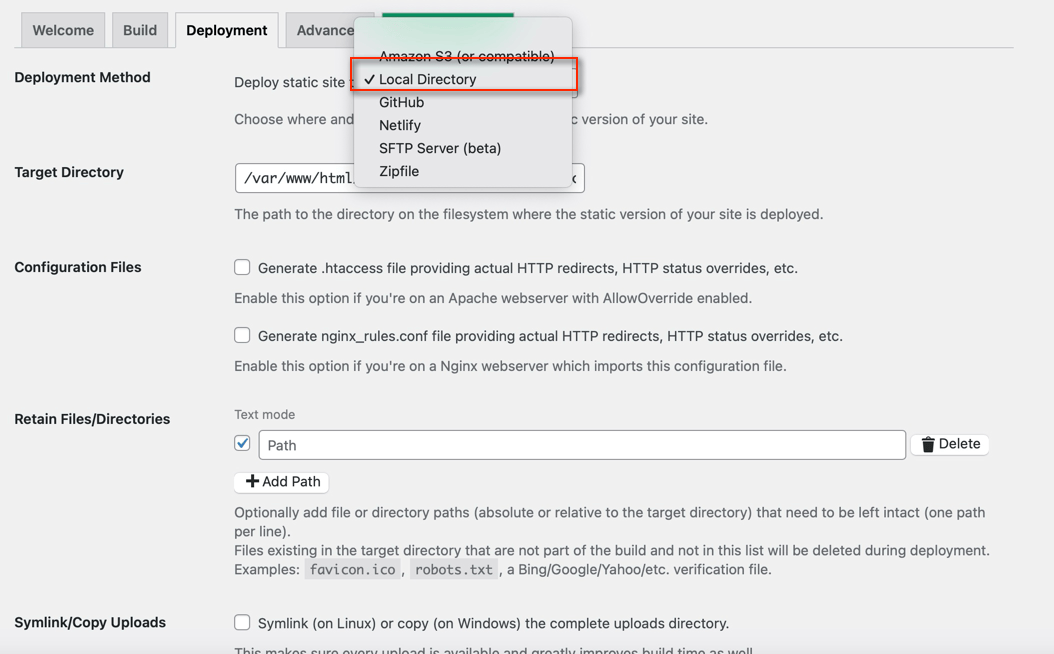
Deployment Method (on the DEPLOYMENT tab): These are the options on how and where you would like to generate your new static website. By default LOCAL DIRECTORY is selected, meaning the plugin will create your new static website in a folder on your computer, and then you move it where you want to. However, there are other options to deploy (publish) directly to the internet. In a future article we will take a look at how to publish your website to GitHub. For now, if you don’t have a specific deployment destination, just leave it as LOCAL DIRECTORY.
Target Directory: Directly related to the option above. This is where your static website copy will be created on your computer. You may want to note this - or change it - so you aren't hunting for your new static website on your computer later.
Step 6: Generate Your Website
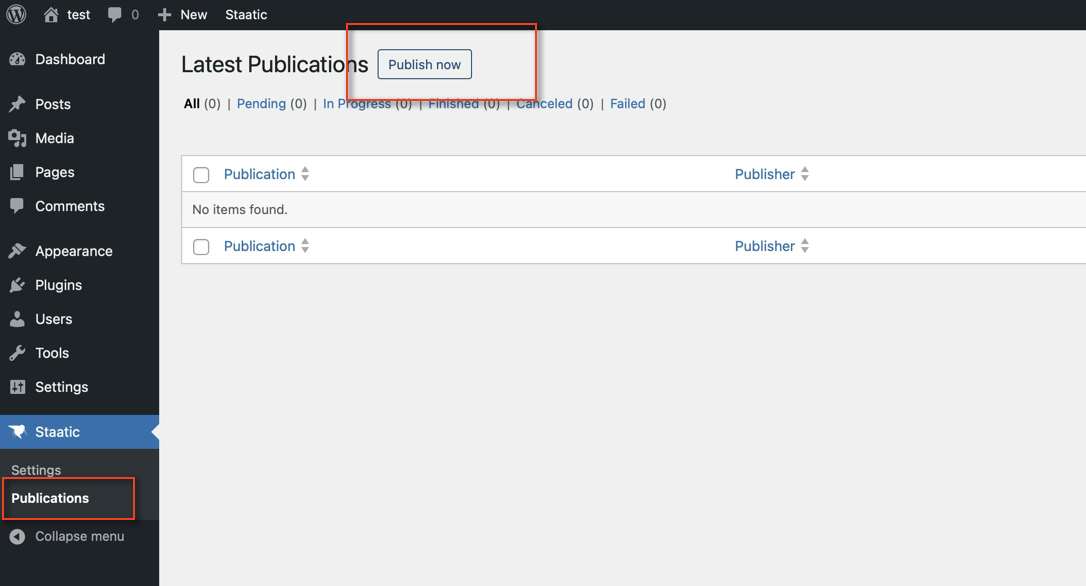
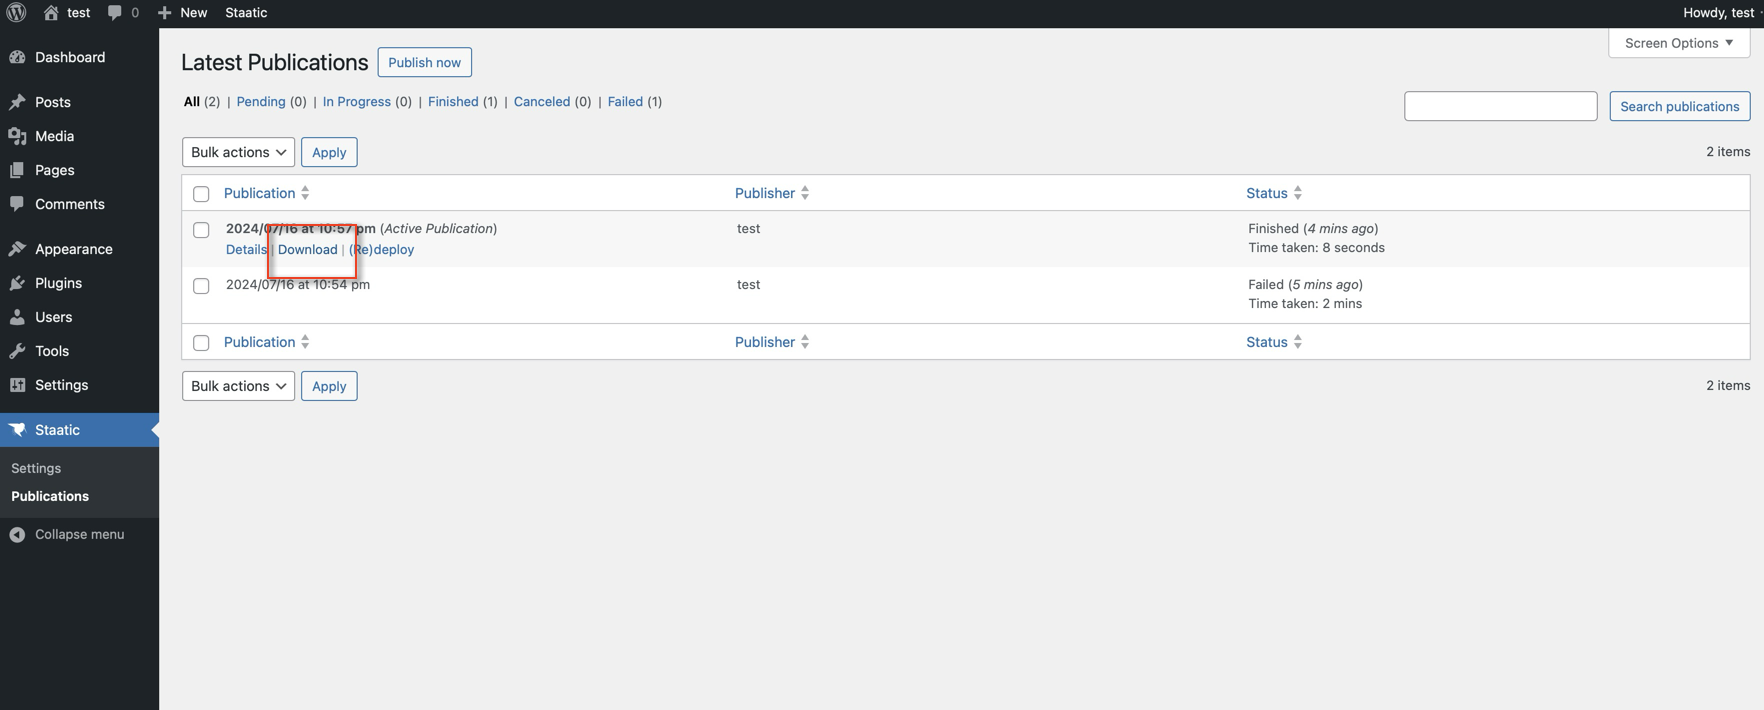
Ok we've made it to the last step - once you are ready with your website, you can click on the STAATIC option in the WP Admin, and click the second link - Publications. On the new screen that appears, click the PUBLISH NOW button.
If all goes according to plan, you should see a series of information after the process is complete (it will surely look different than the following screen).
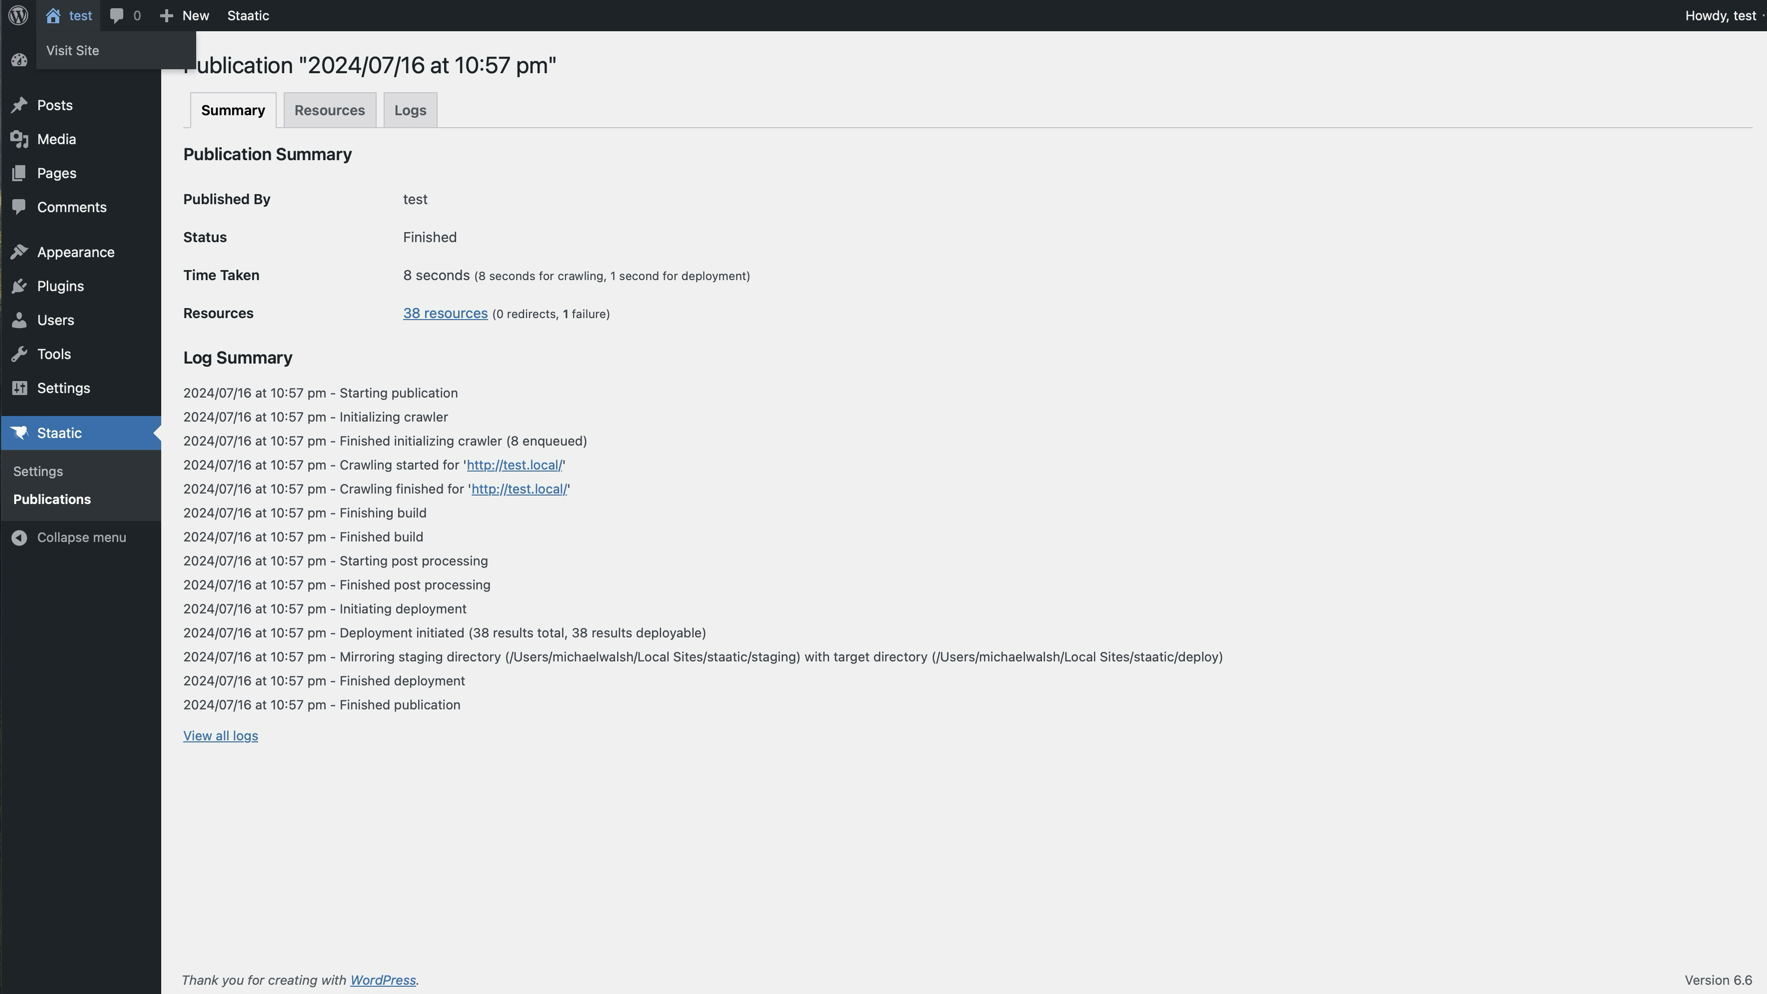
If there are no errors, you should be all set! You can click on the RESOURCES tab (see image above) or the DOWNLOAD link in the following image to download your new website.
Thank you for making it this far! I hope this guide was useful. In a follow-up article I will show you how to deploy that new static website directly to GitHub, so you can have a simple, fast, safe and free (hosting) website!
Photo Used: pixabay.com